In the ever-evolving ecosystem of container management and orchestrators, new solutions continue to emerge to facilitate and optimize the process. One of these innovative solutions is Karpenter, an open source project from the AWS Foundation that positions itself as an autoscaler cluster for Kubernetes.
While traditional container management platforms can sometimes struggle to balance resources efficiently, Karpenter promises optimal and efficient node allocation, saving time and resources.
How does Karpenter work?
It’s essential to understand how Karpenter works. It’s a Kubernetes controller that automates node management and resource allocation. What sets it apart is its ability to make real-time decisions on how to allocate resources based on pod requests, ensuring optimal resource utilization.
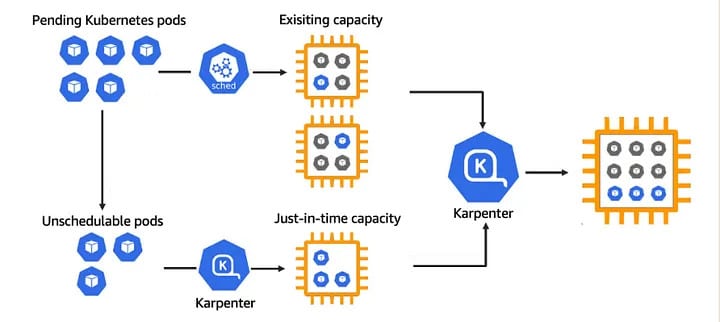
Compared with other Kubernetes cluster management tools, Karpenter stands out for its pod-centric approach. Where other tools allocate resources based on nodes, Karpenter allocates them based on pod needs. This difference may seem subtle, but it has a profound impact on the efficiency of resource allocation.
As such, Karpenter has several key features that set it apart from other Kubernetes node management solutions:
 |
Resource Allocation Based on Pods | Karpenter decides resource allocation based on specific pod requirements, enabling optimal resource utilization. |
|---|---|---|
 |
Multi-Cloud and On-Premise Support | Designed to work with multiple cloud service providers like AWS, Google Cloud, and Azure, as well as on-premise environments. |
 |
Proactive Pod Eviction | Proactively evicts pods to free up resources for pending pods, thus improving resource utilization efficiency. |
 |
Rapid Scalability | Capable of rapidly scaling nodes based on demand, effectively addressing workload fluctuations. |
 |
Utilization of Any Node Type | Karpenter can work with any type of node available in the cluster, offering increased flexibility. |
 |
Unused Node Recycling | Identifies and reuses underutilized nodes, contributing to cost reduction and efficiency improvement. |
Setting up Karpenter
Installing and setting up Karpenter requires a working Kubernetes infrastructure, and access to the AWS console.
1. Install the Helm repository
2. Update the repository
					helm repo add karpenter https://charts.karpenter.sh
helm repo update
helm fetch karpenter/karpenter — untar
3. Retrieve the charts and check the values: the 2 most important are “clusterName” and “clusterEndpoint”, and they can be found in your AWS console.
4. Install Karpenter
helm upgrade --install karpenter . --values values.yaml -n karpenter --create-namespace
5. You should see the “webhook” and “controller” pods deployed
Now that Karpenter is installed on your infrastructure, it’s time to create a “provisioner” to monitor unplanned pods and take any necessary action.
A provisioner is a Kubernetes resource that defines node allocation rules for Karpenter. You can create a provisioner by applying a YAML file like this one:
					apiVersion: karpenter.sh/v1alpha5
kind: Provisioner
metadata:
  name: default
spec:
  ttlSeconds: 600
  requirements:
  - key: node.kubernetes.io/instance-type
    operator: In
    values: ["m5.large", "m5.2xlarge"]
This YAML file creates a provisioner that configures Karpenter to allocate nodes that are either m5.large or m5.2xlarge. Nodes that don’t receive work for 600 seconds are automatically deleted (ttlSeconds: 600).Finally, to check that everything’s working properly, you can create a deployment that requires resources that would necessitate the allocation of new nodes. You should see Karpenter allocate new nodes to meet this request.
What are Karpenter’s limits?
While it offers undeniable advantages over standard autoscaler clusters, it does have its limitations. The most important of these are as follows:
- Cloud provider limitations: Although Karpenter supports several cloud service providers, the full range of features may not be available for all providers.
- Managing performance-sensitive applications: For highly performance-sensitive applications, Karpenter’s pod-based resource allocation may not be sufficient. In some cases, finer-grained resource management at node level may be required.
- Compatibility with other Kubernetes cluster management tools : Karpenter may not be fully compatible with some other Kubernetes cluster management tools. It is therefore important to test Karpenter in your specific environment before adopting it on a large scale.
- New to the market: As a newcomer to the market, Karpenter may still have bugs or unknown issues. We recommend keeping this in mind, and keeping a close eye on updates and new releases.
- Limited documentation and community support: Parallel to the previous point, documentation and community support may be limited compared to more established solutions. However, this should improve over time as the community around Karpenter grows.
To conclude
Karpenter is a powerful autoscaling solution that offers many advantages over standard autoscaling clusters. With its ability to optimize resource utilization, customize scaling and be easy to use, Karpenter is an indispensable tool for Kubernetes users.